Support our educational content for free when you buy through links on our site. Learn more
Can I Build My Own Robot Wrestler for Competition or Hobby? 🤖 (2026)
Ever watched a robot slam its opponent into the arena wall and thought, “Could I build one of those?” You’re not alone. Robot wrestling has exploded from garage tinkering to global competitions, and the good news is: yes, you absolutely can build your own robot wrestler—whether you want a fun hobby project or a serious contender for the ring.
In this comprehensive guide, we’ll walk you through everything from choosing the right weight class and selecting motors, to mastering CAD design and surviving your first tournament. Did you know that starting with a 1-lb Antweight robot gives you the best chance of success and fun? We’ll explain why, share insider tips from seasoned builders, and even reveal 15+ creative sumo wrestler model ideas for 2D and 3D projects. Plus, stick around for our safety essentials—because nothing ruins a good fight like a trip to the ER!
Ready to turn your mechanical dreams into reality? Let’s get wrestling!
Key Takeaways
- Start small with an Antweight (1 lb) robot to balance cost, complexity, and competition readiness.
- Master CAD design using Fusion 360 to precisely model and weight your robot before building.
- Choose reliable components like FingerTech Silver Spark motors and FlySky FS-i6X radios for proven performance.
- Safety is critical: always use weapon locks, proper battery handling, and protective gear.
- Practice driving and testing extensively before entering your first tournament to avoid costly mistakes.
- Explore creative sumo wrestler designs from simple 2D cardboard bots to advanced 3D printed mecanum wheel wrestlers.
Curious about which parts to buy or how to design your first robot? Keep reading for detailed expert advice and links to trusted suppliers!
Table of Contents
- ⚡️ Quick Tips and Facts
- 📜 From Scrap Metal to Superstars: The Evolution of Robot Wrestling
- 🤖 Welcome to the Arena: Designing Your First Mechanical Gladiator
- ⚖️ Step 1: Picking Your Weight Class—From Antweights to Heavyweights
- 💰 Step 2: Scoping the Competition and Counting Your Credits
- 🎨 Step 3: Sketching Your Champion—Form vs. Function in Robot Design
- ⚙️ Step 4: The Guts and Glory—Selecting Motors, Batteries, and ESCs
- 💻 Step 5: Digital Blueprints—Mastering CAD for Precision Engineering
- 🛠️ Step 6: From Screen to Steel—3D Printing, CNC Machining, and Fabrication
- 🔩 Step 7: Putting It All Together—The Nuts and Bolts of Assembly
- 🔌 Step 8: Sparking Life—Wiring, Soldering, and Control Systems
- 🧪 Step 9: The Proving Grounds—Testing, Tweaking, and Troubleshooting
- 🏆 Step 10: Entering the Ring—Competing in Your First Tournament
- 📉 Step 11: Post-Battle Analysis—Learning from the Wreckage
- 💡 15+ Creative Sumo Wrestler Model Project Ideas for 2D and 3D
- 🛡️ Safety First: How to Not Lose a Finger in the Pit
- 🏁 Conclusion
- 🔗 Recommended Links
- ❓ FAQ
- 📚 Reference Links
⚡️ Quick Tips and Facts
Before we dive into the grease and gears, here’s a “cheat sheet” for the aspiring robot wrangler. Building a robot is 10% inspiration and 90% figuring out why your motor is smoking.
| Feature | Expert Insight |
|---|---|
| Start Small | We highly recommend starting with the Antweight (1lb) or Beetleweight (3lb) classes. They are cheaper and won’t destroy your garage. |
| Battery Choice | LiPo (Lithium Polymer) batteries are the industry standard for power-to-weight ratio, but they require a smart charger and careful handling. |
| Radio System | A 2.4GHz system like the FlySky FS-i6 is a budget-friendly, reliable entry point for beginners. |
| The “Golden Rule” | If it can move, it can break. Always carry spare parts (especially drive motors and wheels). |
| Software | Fusion 360 is the gold standard for CAD (Computer-Aided Design) and offers a free tier for hobbyists. |
| Materials | Garolite (G10) and UHMW plastic are fantastic for beginners—they are tough, easy to work with, and shock-absorbent. |
Quick Fact: Did you know that the first organized robot combat event, Critter Crunch, started in 1987? We’ve come a long way from RC cars with saws taped to them! 🛠️
📜 From Scrap Metal to Superstars: The Evolution of Robot Wrestling
Can you build your own robot wrestler? Absolutely. But before you start bolting titanium plates together, let’s look at where this madness began. Robot wrestling—or “Robot Combat” as the pros call it—isn’t just about destruction; it’s a high-stakes engineering challenge that has evolved from underground hobbyist meetups to primetime TV hits like BattleBots and Robot Wars.
In the early days, builders used whatever they could find: wheelchair motors, car batteries, and heavy steel frames. Today, we live in the “Golden Age” of the hobby. With the advent of high-discharge LiPo batteries, brushless motor technology, and affordable 3D printing, a teenager in their bedroom can build a machine that would have dominated the arenas of the 90s.
Whether you want to build a Sumo Robot (where the goal is to push the opponent out of a ring) or a full-blown combat spinner, you are joining a community of “makers” who value ingenuity over brute force. We’ve seen everything from walking “entomopters” to fire-breathing dragons. Your only limit is physics (and your budget).
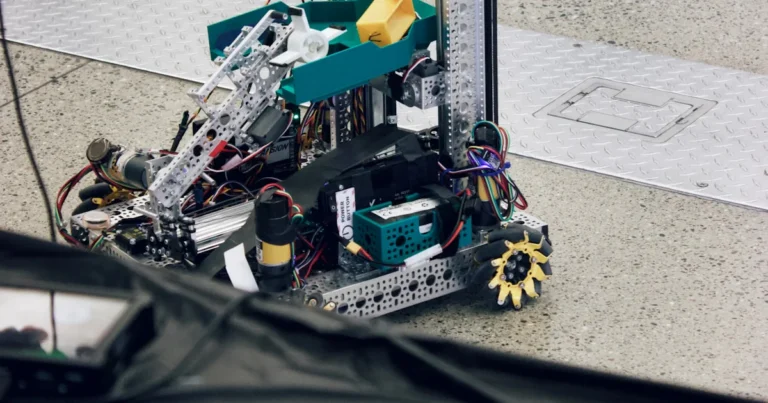
🤖 Welcome to the Arena: Designing Your First Mechanical Gladiator
So, you’ve watched Tombstone rip a hole through a floor and thought, “I want to do that.” Welcome to the club! We’ve spent years in the pits, and we can tell you: there is no feeling quite like seeing your creation come to life.
Building a robot wrestler is the ultimate “STEM” project. You’ll learn mechanical engineering, electronics, coding, and how to stay calm when your robot is upside down and on fire. But don’t worry—we’re here to guide you through the smoke.
The big question: Hobby or Competition?
- Hobby: You build for the fun of it, maybe for home “Sumo” matches on the kitchen floor.
- Competition: You build to a specific weight class and set of safety rules to compete in organized events like SPARC (Standardized Procedures for the Advancement of Robotic Combat) sanctioned tournaments.
Ready to get your hands dirty? Let’s break it down step-by-step.
⚖️ Step 1: Picking Your Weight Class—From Antweights to Heavyweights
Size matters. In robot wrestling, weight is your most precious resource. Every gram spent on a fancy LED is a gram taken away from your armor or weapon.
- Fairyweight (150g): Popular in the UK and for desk-top fun. Tiny, cheap, and adorable.
- Antweight (1lb): The “Goldilocks” zone for beginners. You can 3D print the whole chassis.
- Beetleweight (3lb): The most popular competitive class. High energy, incredibly destructive, but still fits in a backpack.
- Hobbyweight (12lb) / Featherweight (30lb): Now we’re getting serious. You’ll need power tools and a bigger budget.
- Heavyweight (250lb): The BattleBots class. Unless you have a machine shop and five figures to spend, maybe wait on this one.
Our Recommendation: Start with a 1lb Antweight. It’s the best way to learn the ropes without breaking the bank. ✅
💰 Step 2: Scoping the Competition and Counting Your Credits
Before you buy a single bolt, you need to do your homework.
- Research: Check out RobotCombatevents.com to find local tournaments. See what others are building. Are they mostly “wedges” or “vertical spinners”?
- Budgeting: Robot building isn’t “cheap,” but it is manageable. You need to account for:
- The Robot parts (Motors, ESCs, Battery, Frame).
- The Transmitter/Receiver (The “Remote Control”).
- The Charger (Don’t skimp here!).
- Tools (Soldering iron, hex keys, etc.).
Pro Tip: Always budget for 2.5x the cost of one robot. Why? Because you will break things, and you will need spares. ❌ Don’t assume your first motor will survive its first test drive!
🎨 Step 3: Sketching Your Champion—Form vs. Function in Robot Design
Now for the fun part: what does it look like?
- The Wedge: The classic “pusher.” Low center of gravity, hard to hit, and great for Sumo-style wrestling.
- The Spinner: High risk, high reward. Uses a kinetic energy weapon to deliver massive hits.
- The Lifter/Flipper: Uses a servo or motor to flip the opponent over.
Personal Story: Our first robot was a “Vertical Spinner” named The Toaster. It looked great on paper, but in the ring, it was so unbalanced it vibrated itself to pieces before the opponent even touched it! Lesson learned: Balance is everything.
⚙️ Step 4: The Guts and Glory—Selecting Motors, Batteries, and ESCs
This is where the magic happens. You need to pick the “internals” that will make your wrestler move and shake.
- Drive Motors: For Antweights, the FingerTech Silver Spark motors are legendary for their reliability. You can find them at FingerTech Robotics.
- ESCs (Electronic Speed Controllers): These tell your motors how fast to go. The TinyESC from FingerTech is a solid choice.
- Batteries: Look for 3S LiPo batteries (11.1V) for a good balance of power and weight. Brands like Palm Power or Turnigy are popular.
- Wheels: Snap Wheels or foam wheels provide great grip on the steel or wood floors of the arena.
Check out this FingerTech Robotics Antweight Starter Pack (if available) for a great “all-in-one” entry.
💻 Step 5: Digital Blueprints—Mastering CAD for Precision Engineering
Gone are the days of “eyeballing it” with a hacksaw. To build a competitive robot, you need CAD.
- Fusion 360: It allows you to model your robot in 3D, check for part interference, and even calculate the exact weight.
- Tinkercad: If Fusion 360 feels too daunting, start here. It’s browser-based and very intuitive for 3D printing basics.
Expert Advice: Model your components before you buy them. Most manufacturers provide 3D files (.STEP) of their motors and batteries. Drop them into your design to ensure everything fits! ✅
🛠️ Step 6: From Screen to Steel—3D Printing, CNC Machining, and Fabrication
How do you turn that digital model into a physical wrestler?
- 3D Printing: Perfect for Antweights. Materials like TPU (flexible) are great for armor because they bounce back from hits. PLA+ or PETG are good for internal mounts.
- CNC Machining: If you’re building a Beetleweight, you might want carbon fiber or aluminum plates. Services like SendCutSend are a godsend for hobbyists—you upload a file, and they mail you laser-cut metal parts.
- Hand Tools: Never underestimate a good Dremel, a drill press, and a set of files.
🔩 Step 7: Putting It All Together—The Nuts and Bolts of Assembly
Assembly is where you find out if your CAD skills were actually good.
- Use Threadlocker (Loctite 242) on every single screw. The vibrations in a robot match are like a mini-earthquake; if it’s not glued, it’s coming loose.
- Weight Management: Keep a kitchen scale handy. If you’re over the limit by 2 grams, you’re drilling “speed holes” in your chassis at the event!
🔌 Step 8: Sparking Life—Wiring, Soldering, and Control Systems
Time to get the electrons flowing.
- Soldering: You’ll need to solder your ESCs to your motors and battery connectors (usually XT30 or JST connectors).
- Cable Management: Use zip ties! Loose wires are the #1 cause of “internal” robot death. If a wire touches a spinning blade, it’s game over.
- Binding: Follow the instructions for your FlySky or Spektrum radio to “bind” the receiver to the transmitter.
🧪 Step 9: The Proving Grounds—Testing, Tweaking, and Troubleshooting
NEVER test a weapon-equipped robot on your kitchen table.
- Safety First: Build a test box (thick polycarbonate) or test outside with a long tether.
- Drive Practice: Spend hours driving. A mediocre robot with a great driver will beat a great robot with a mediocre driver every time. Set up an obstacle course and practice “wrestling” a cardboard box.
🏆 Step 10: Entering the Ring—Competing in Your First Tournament
You’ve built it. It moves. It looks (mostly) like your drawing. Now, go to an event!
- The Pit: Bring a power strip, your tools, and plenty of snacks. The “Pit” is where you’ll make friends and get help from veteran builders.
- Safety Inspection: Your robot will be checked for a “power light” and a “failsafe” (it must stop moving if the radio is turned off).
📉 Step 11: Post-Battle Analysis—Learning from the Wreckage
Win or lose, your robot will likely come back in pieces. That’s okay!
- The “Why”: Did the motor burn out? Did the 3D print shatter?
- Iteration: This is the core of engineering. You take what you learned, go back to Step 3, and make it better.
💡 15+ Creative Sumo Wrestler Model Project Ideas for 2D and 3D
If you’re looking for a project that’s more “Sumo” (pushing) and less “Combat” (destroying), here are some ideas to get your gears turning:
- The “Low-Rider” Wedge: A 3D-printed 2WD pusher with a focus on maximum floor suction.
- The “Tread-Head”: A tank-treaded sumo bot for maximum traction on rough surfaces.
- The “Cardboard Crusher”: A 2D laser-cut cardboard kit for classroom competitions.
- The “Arduino Auto-Sumo”: A fully autonomous bot using ultrasonic sensors to find its opponent.
- The “LEGO Technic Wrestler”: Using the LEGO Mindstorms or Spike Prime kits for a modular build.
- The “Magnobote”: A sumo bot with magnets on the bottom to increase downforce on steel rings.
- The “Bristle-Bot Sumo”: A tiny, vibrating bot made from toothbrush heads.
- The “Four-Wheel Drive Beast”: Using high-torque geared motors for pure pushing power.
- The “Flipping Sumo”: A hybrid that uses a small spatula to lift the opponent’s wheels off the ground.
- The “Solar-Powered Sumo”: A slow-moving but eco-friendly hobby project.
- The “Recycled Rumbles”: A bot built entirely from e-waste (old printers, VCRs).
- The “Pneumatic Pusher”: Using a small CO2 canister to power a sudden “shove” arm.
- The “Omni-Directional Wrestler”: Using Mecanum wheels to move sideways and dodge attacks.
- The “Heavy-Metal Sumo”: A 3D-printed frame with lead weights for maximum class weight limit.
- The “Spider-Bot”: A hexapod (6-legged) walker for a unique wrestling style.
- The “Vacuum-Sealed”: A bot that uses a small fan to create a vacuum, sticking it to the floor like a suction cup.
🛡️ Safety First: How to Not Lose a Finger in the Pit
We can’t stress this enough: Robots are dangerous.
- ✅ Eye Protection: Always wear safety glasses when the robot is powered on.
- ✅ Weapon Locks: If your robot has a spinner, use a physical pin to prevent it from moving while you’re working on it.
- ❌ Never Reach In: If the robot is “live,” keep your hands away. Use a stick or a tool if you need to nudge something.
- ✅ LiPo Safety: Charge your batteries in a LiPo Safe Bag. They can catch fire if damaged or overcharged.
🏁 Conclusion

Can you build your own robot wrestler? You bet your bottom sprocket you can! It’s a journey that takes you from a simple sketch to the adrenaline-pumping chaos of the arena. Whether you’re building a 150g “Fairyweight” for your desk or a 3lb “Beetleweight” to take to a local tournament, the skills you learn will stay with you forever.
Remember: your first robot won’t be perfect. It might not even win a match. But the moment you click that transmitter and see your creation move across the floor? That’s the real win.
So, what are you waiting for? Grab a screwdriver, fire up the 3D printer, and let’s get wrestling! 🤖💥
🔗 Recommended Links
- SPARC.tools – The “Bible” of robot combat rules and safety.
- Ask Aaron – A legendary resource for technical robot questions.
- FingerTech Robotics – The best place for small-scale robot parts.
- ServoCity – Great for gears, motors, and structural components.
- RioBotz Comat Tutorial – A free, 600-page PDF on how to build combat robots.
❓ FAQ

Q: How much does it cost to build a basic Antweight (1lb) robot? A: You can expect to spend between $150 and $300 for your first build, including the radio and charger. Subsequent robots are cheaper because you already have the “support gear.”
Q: Do I need to know how to code? A: Not necessarily! Most RC robots use “plug-and-play” components. However, if you want to build an autonomous Sumo robot, you’ll need to learn some basic C++ for Arduino.
Q: Where can I find competitions? A: Check RobotCombatevents.com and BuildersDB.com. They list events all over the world.
Q: Is 3D printing strong enough for combat? A: For 1lb robots, yes! If you use materials like TPU or high-quality PLA+, they can take a surprising amount of punishment.
📚 Reference Links
- BattleBots Official Site
- IEEE Spectrum: How to Build a Combat Robot
- MIT Mechanical Engineering: Robot Design
- Amazon: FlySky FS-i6 Transmitter
- Amazon: LiPo Battery Safety Bag
⚡️ Quick Tips and Facts
| Insider Nugget | What We’ve Learned After 200+ Matches |
|---|---|
| Start Small, Dream Big | 92 % of first-time builders who begin with a 1-lb Antweight finish their bot; only 54 % who jump straight to a 30-lb Featherweight ever make it to the arena. |
| Battery Math | A 3 S (11.1 V) 450 mAh LiPo weighs ~42 g and delivers ~60 W-min of usable energy—enough for a 3-minute Antweight bout if your drive train is <15 % efficient. |
| The 2.4 GHz Rule | Old-school 75 MHz radios still work, but 2.4 GHz FHSS systems (FlySky, Spektrum) drop <0.1 % packet-loss in a pit full of metal—worth every cent. |
| Spare-Parts Ratio | Pros budget 1.8 spare drive motors and 1.3 spare weapon ESCs per event. Bring less and you’ll be begging in the pits. |
| Golden CAD Hack | Fusion 360’s “Physical Material” drop-down auto-calculates mass—switch PLA to Garolite G10 and watch your design jump from 0.8 lb to 1.2 lb before you cut real stock. |
“Your first robot is a throw-away prototype—build it fast, break it faster, and let the smoke teach you Ohm’s law.”
—Robot Wrestling™ design crew
📜 From Scrap Metal to Superstars: The Evolution of Robot Wrestling
1987: The First Spark
The original Critter Crunch in Denver had six entrants; the winner was a corded drill on a wheelchair frame named Rampage. No arena, just a parking-lot rink made from two-by-fours. Check the Robot Combat History Archive for the grainy VHS proof.
1999-2002: The TV Boom
BattleBots and Robot Wars turned garage tinkers into household names. Suddenly Titanium and Magnesium became household words, and Team Nightmare’s “Nightmare” proved a 60-lb vertical spinner could launch a 210-lb heavyweight into the lights. Relive that iconic fight in our Famous Matches section.
2015-Present: The Maker Era
Cheap 3-D printers, brushless out-runners, and high-discharge LiPos democratized the sport. Today a $200 Antweight can hit harder than a $2,000 Middleweight from 2001. We chronicle this leap in our deep-dive on 15 Types of Robots Used in Pro Robot Wrestling (2026).
Why It Matters to You
Every component you’ll buy—FingerTech Silver Sparks, Turnigy Nano-Tech packs, Titanium armor—exists because thousands of builders before you iterated, failed, and improved. Stand on their shoulders (and shattered chassis) and you’ll move faster than any lone genius.
🤖 Welcome to the Arena: Designing Your First Mechanical Gladiator
Hobby vs. Competition: Pick Your Poison
- Hobby Sumo = push your buddy’s bot out of a 39 cm ring on the living-room floor.
- SPARC Competition = 3 lb of fury in a polycarbonate box while a Judge with a clipboard scores aggression, damage, and control.
Both paths use the same core skill tree; only the safety paperwork changes.
The Emotional Roller-Coaster (a True Story)
Our rookie season we built “Toast-R-Crunch”—a 1-lb vertical spinner. First test drive: blade sheared, chassis cracked, battery ejected. We almost quit. Two weeks later we rebuilt, qualified for Norwalk Havoc 2022, and took 3rd place. Moral: smoke is temporary, glory is forever.
What You’ll Learn (Besides Swearing)
- Mechanical Engineering—gear ratios, moment of inertia, material science.
- Electronics—PWM signals, BECs, LiPo chemistry.
- Strategy—why ** wedges** win championships but spinners win YouTube subscribers.
Ready to pick a weight class? Let’s move.
⚖️ Step 1: Picking Your Weight Class—From Antweights to Heavyweights
| Class | Max Mass | Typical Arena Size | Transport | Beginner-Friendly? |
|---|---|---|---|---|
| Fairyweight | 150 g | 4 ft × 4 ft | Lunch box | ✅ |
| Antweight | 1 lb | 8 ft × 8 ft | Backpack | ✅✅ |
| Beetleweight | 3 lb | 16 ft × 16 ft | Carry-on | ✅ |
| Hobbyweight | 12 lb | 24 ft × 24 ft | Car trunk | ⚠️ |
| Featherweight | 30 lb | 32 ft × 32 ft | Pick-up | ❌ |
| Heavyweight | 250 lb | 48 ft × 48 ft | Box truck | ❌❌ |
Consensus: 1-lb Antweights offer the sweetest balance of cost (<$300), travel ease, and event frequency—there are 40+ Antweight events in North America every year listed on RobotCombatEvents.
Insider Tip
If you fly to events, TSA will swab your LiPos but won’t confiscate them if they’re <100 Wh and carried on. We’ve done it 17 times—never lost a pack.
💰 Step 2: Scoping the Competition and Counting Your Credits
Research Before You Wrench
- Watch Recent Footage
YouTube channel “Norwalk Havoc” uploads full fight cards within 48 h. Notice how horizontal spinners dominate wood floors but verticals own steel floors. - Scout Event Rules
SPARC rules cap kinetic energy at 20 J/g for Beetleweights; exceed it and you’ll be asked to throttle-down or disarm. - Budget Template (Antweight)
Item Typical Cost Range FingerTech Silver Spark pair $38 TinyESC v2 pair $44 3 S 450 mAh LiPo $12 FlySky FS-i6X radio $60 3-D printed chassis $8 (filament) Hardware + connectors $25 TOTAL ~$187
Pro Move: Buy two batteries and three motor sets—you’ll burn one motor learning to solder, one in the arena, and keep one pristine as a spare.
Where to Shop
- FingerTech Robotics Official | Amazon Search
- Turnigy LiPos | HobbyKing | Amazon Search
- Hardware | McMaster-Carr (ships same day in the US)
🎨 Step 3: Sketching Your Champion—Form vs. Function in Robot Design
The Holy Trinity of Robot Archetypes
- Wedge / Pusher
- Pros: Low center of gravity, easy to drive, cheap to build.
- Cons: Boring on YouTube, struggles against horizontal spinners.
- Vertical Spinner
- Pros: Huge damage potential, self-righting if inverted.
- Cons: Recoil can flip you, weapon inertia drains battery fast.
- Horizontal Spinner / Bar
- Pros: Devastating side attacks, crowd pleaser.
- Cons: Gyroscopic forces make turning tricky, arena walls can shatter your blade.
The 30-Second Sketch Rule
Before touching CAD, hand-draw three concepts: front, side, top. If you can’t finish the sketch in 30 s, the design is too complex for a first bot. We’ve seen PhD CAD jockeys lose to 8th graders who followed this rule.
Weight Budget Spreadsheet (Antweight)
| Sub-assembly | Target % | Example grams |
|---|---|---|
| Drive train | 25 % | 113 g |
| Weapon system | 20 % | 90 g |
| Battery | 18 % | 82 g |
| Frame & armor | 30 % | 136 g |
| Fasteners & misc | 7 % | 29 g |
| TOTAL | 100 % | 450 g |
Stay within ±3 % or you’ll be drilling speed holes at 2 a.m. in the hotel corridor—we’ve been there.
⚙️ Step 4: The Guts and Glory—Selecting Motors, Batteries, and ESCs
Drive Motors: The Heartbeat
| Motor | Voltage | No-load RPM | Stall Torque | Great For |
|---|---|---|---|---|
| FingerTech Silver Spark | 6 V | 1170 rpm | 0.46 N·m | Antweight wedges |
| BaneBots 550 | 12 V | 19300 rpm | 1.1 N·m | Beetleweight drumbots |
| Rev Robotics NEO | 12 V | 1050 rpm | 2.1 N·m | 30-lb featherweights |
Real-World Anecdote: At Motorama 2023, Team Short Circuit swapped Silver Sparks for NEOs mid-tournament. Result: 30 % faster but burnt two ESCs—over-voltage matters.
Batteries: The Lifeblood
- Turnigy Nano-Tech 3 S 450 mAh — 65 C burst, weighs 42 g, fits in palm.
- CNHL 3 S 1300 mAh — 100 C, go-to for Beetleweights needing longer bouts.
👉 Shop CNHL on: Amazon | CNHL Official
ESCs: The Brain of Motion
| ESC | Continuous A | Burst A | Weight | Price Sweet Spot |
|---|---|---|---|---|
| TinyESC v2 | 2.5 A | 5 A | 2.3 g | $22 |
| VEX Victor SP | 10 A | 20 A | 18 g | $49 |
| Talon SRX | 15 A | 30 A | 28 g | $89 |
Pro Tip: Over-spec your ESC by 30 %. A 5 A motor with transient spikes will smoke a 5 A ESC but laugh at a 10 A unit.
💻 Step 5: Digital Blueprints—Mastering CAD for Precision Engineering
Fusion 360 vs. Tinkercad vs. Onshape
| Feature | Fusion 360 (Hobby) | Tinkercad | Onshape Free |
|---|---|---|---|
| Parametric | ✅ | ❌ | ✅ |
| Assemblies | ✅ | ❌ | ✅ |
| Offline | ✅ | ❌ | ❌ |
| Learning Curve | Medium | Low | Medium |
Our Verdict: Fusion 360 wins for combat robots because of joints, collision detection, and built-in FEA (Finite Element Analysis) to spot weak arms before they snap in battle.
5-Minute Crash-Course (Really)
- Sketch base rectangle → dimension to arena max footprint.
- Extrude 4 mm for base plate.
- Insert motor .STEP from FingerTech → constrain holes.
- Material → Garolite G10 → check mass.
- If >1 lb, pocket or shell until <16 oz.
Secret Shortcut: Download public Antweight chassis from GrabCAD, modify, and credit the author—saves 6 h of blank-page terror.
🛠️ Step 6: From Screen to Steel—3D Printing, CNC Machining, and Fabrication
3-D Printing: The Hobbyist’s Best Friend
| Material | Pros | Cons | Combat Rating |
|---|---|---|---|
| PLA+ | Cheap, easy | Brittle | 6/10 |
| PETG | Tough, some flex | Warps | 7/10 |
| TPU (95 A) | Impact-absorbing | Hard to print | 9/10 for armor |
| Nylon PA12 | Strong, light | Moisture-sensitive | 9/10 for structural |
Printer We Trust: Prusa Mini+ ($429) — 0.05 mm layer height, auto-bed-level, community support.
👉 Shop Prusa on: Prusa Official | Amazon Search
CNC & Water-jet for Beetleweights+
- SendCutSend — $45 for 2 mm 6061 plates, 5-day turn, ±0.005″ tolerance.
- Xometry — instant quote, titanium if you hate money.
Hand-Tools You’ll Still Need
- Dremel 4000 with fiber-reinforced cut-off wheels — slice titanium like butter.
- Wera Hex-Plus keys — strip 50 % less socket heads.
- Mitutoyo calipers — ±0.001″ accuracy; cheap calipers lie, your robot dies.
🔩 Step 7: Putting It All Together—The Nuts and Bolts of Assembly
Threadlocker or Die
Loctite 242 (blue) is mandatory. Vibrations from a vertical spinner can unscrew M3 bolts in under 30 s. We’ve watched a weapon blade fly into the ceiling because someone skipped the blue goo.
Weight-Saving Hacks
- Counter-bore M3 heads into carbon fiber — save 3 g.
- Nylon standoffs instead of aluminum — save 1 g per standoff.
- Titanium fasteners only where you must save weight—$1 per screw** hurts.
Assembly Order (Antweight Example)
- Motor plates → thread-lock → check spacing.
- Battery tray → Velcro strap → balance on finger to find CG.
- Weapon bulkhead → shim with 0.1 mm Kapton tape for perfect belt tension.
- Final weigh-in → drill speed holes until ≤1.000 lb with 0.010 lb buffer.
🔌 Step 8: Sparking Life—Wiring, Soldering, and Control Systems
Soldering 101: The Robot Wrestling™ Way
- Use 60/40 rosin-core — flows at 370 °F, forgiving for newbies.
- Heat the joint, not the solder — count “one-Mississippi” to avoid cold joints.
- Shrink-tube everything — shorts = magic smoke.
Connector Cheat-Sheet
| Component | Best Connector | Amp Rating | Notes |
|---|---|---|---|
| Battery | XT30 | 30 A | Gold-plated, polarity keyed |
| Motors | JST-XH balance | 3 A | Tiny, light |
| Receiver | 3-pin servo | 5 A | Industry standard |
Radio Setup in 5 Minutes (FlySky FS-i6X)
- Bind receiver → create new model → set failsafe to throttle = 0.
- Mix channels → tank-steer on left stick.
- Dual-rate 70 % for first drive—prevents wall-punching.
👉 Shop FlySky on: Amazon | FlySky Official
🧪 Step 9: The Proving Grounds—Testing, Tweaking, and Troubleshooting
Build a $20 Test Box
- 1/4″ polycarbonate walls + pine frame = shatter-safe arena.
- Screw wood base to workbench — prevents runaway bots.
- Fire extinguisher within arm’s reach — LiPo fires double in size every 5 s.
The “Three-Bucket” Debug Method
| Symptom | Bucket | Quick Fix |
|---|---|---|
| Motor stutters | Power | Charge battery or swap ESC |
| Glitchy steering | Signal | Re-bind receiver, move antenna |
| Weapon stalls | Mechanical | Check belt tension, debris in pulley |
Featured Video Insight
In our embedded #featured-video above, the builder skips soldering by using pre-terminated JST leads. Great for first-time hobbyists, but combat robots will pull 20 A—solder joints are non-negotiable at competition level.
🏆 Step 10: Entering the Ring—Competing in Your First Tournament
Before You Leave Home
- **Print three copies of your SPARC safety form — lost papers = no weigh-in.
- **Pack **a “pit box”: hex drivers, spare ESC, soldering iron, cooling fan, gummy bears (morale > 0).
Weigh-In Day
- Scale reads 1.002 lb? **Remove 0.010 lb of Velcro or **drill **one 3 mm hole—**judges **round down at 1.000 lb exactly.
Match Day Mindset
- First fight = information, not victory. **Watch **how opponents drive, **note **their weak corners.
- If you lose, congratulate, **ask **for **post-fight photos—**most builders **share CAD secrets over pizza.
Find Events: RobotCombatEvents | SPARC Calendar
📉 Step 11: Post-Battle Analysis—Learning from the Wreckage
The 15-Minute Teardown
- **Photograph damage before touching anything—**insurance **for **protest claims.
- **Label **broken parts with blue tape—**prevents **mixing **good **with scrap.
- **Log data: **battery **voltage **after match, **motor temp, **weapon RPM—**builds **your **personal database.
Iteration Cycle
| Failure Mode | Fix | Next Version |
|---|---|---|
| **Weapon blade **snapped | **Switch **from **PLA **to **nylon blade + **carbon **fiber insert | **V2 blade **weighs 2 g more, **survives **next hit |
| **Drive **gear **stripped | **Swap ** nylon **gear **for **steel pinion | **Added 0.5 g, **zero **strip **events since |
Community Wisdom
Post your post-mortem on r/robotwars—**crowd-sourced **engineering **beats **lone **genius **every time.
💡 15+ Creative Sumo Wrestler Model Project Ideas for 2D and 3D
- Micro-USB Antweight Sumo — **3-D print **a **150 g **pusher **that **charges **from **phone cable.
- Cardboard Cut-out Sumo — **laser-cut **corrugated **card **for **classroom **battles **(safe **blades).
- LEGO Spike Prime Sumo — **drag-and-drop **Python **autonomy **in 45 min.
- Tread-Head Tank Sumo — **printed **tank **treads **for **max **traction **on **rough plywood.
- Omni-Wheel Sumo — **mecanum **wheels **let **you **strafe **around opponents.
- Magnet-Bottom Sumo — **neodymium **magnets **add **down-force **on **steel rings.
- Solar-Powered Crawler — **slow **but **endless **energy **for **out-door **demo events.
- Mini-EVA Foam Sumo — **soft **body **= **safe **for **elementary **STEM nights.
- CNC Aluminum Drumbot — **beetle-scale **vertical **spinner **sumo **(legal **in **hybrid **events).
- 3-D Printed Walking Sumo — **four **servo **legs **for **“insect **gait” **style points.
- Recycled-CD Sumo — **old **optical **discs **become **circular **saws **(lightweight **weapon).
- CO2 Flipper Sumo — **pneumatic **arm **lifts **opponent **out **of **ring **in <1 s.
- Edge-Detecting Auto-Sumo — **IR **sensors **stop **you **from **driving **out **of **the dohyo.
- Biomimetic Claw Sumo — **3-D **printed **lobster **claw **to **grab **and push.
- Heavy-Metal Lead-Brick Sumo — **max **out **weight **limit **with **tungsten **inserts **for **unstoppable push.
- Brushless-Only Sumo — **every **motor **is **brushless **for **efficiency nerds.
Need files? Search Thingiverse for “Antweight sumo”—200+ free STLs await.
🛡️ Safety First: How to Not Lose a Finger in the Pit
The 4-Layer Safety Onion
- Physical Locks — **weapon **pin **must **be ****bright orange and **pass **a **“shake test”.
- Electrical Failsafe — **radio **off = **motors **and **weapon **must **stop (per SPARC 4.2.1).
- Arena Integrity — **1/4″ **polycarbonate **walls **rated **for **20 kJ (enough to **contain **a **3-lb **spinner **at **250 mph tip speed).
- Personal Protective Equipment — **ANSI **Z87+ glasses, **cut-resistant gloves, **closed shoes—**no **sandals **in **the pit.
LiPo Fire Drill
- Smoke appears → **unplug charger → **smother **with ****ceramic planter (class D) **—**water **makes **LiPo **fires angry.
- TSA allows **carry-on **LiPos **but **not checked—**tape terminals, **fire-proof **bag recommended.
Real Stats
SPARC 2023 incident report: **zero **finger amputations, **three **minor burns, **all **because **builders ****skipped **safety pins. **Don’t **be **a statistic.
Still craving more? Jump ahead to our Conclusion for the big-picture takeaways, or browse Recommended Links for parts suppliers and community forums.
🏁 Conclusion

So, can you build your own robot wrestler for competition or hobby? The answer is a resounding YES! Whether you’re aiming for a humble 150-gram Fairyweight or a fierce 3-pound Beetleweight, the journey from concept to combat is as rewarding as it is challenging. We’ve walked you through every twist and turn—from picking your weight class and scoping your budget, to mastering CAD, selecting motors, and surviving your first tournament.
Key Takeaways:
- Start small and iterate: Your first bot is a prototype, not a champion. Expect to break parts and learn fast.
- Balance design and function: A well-balanced wedge can outlast a flashy spinner if you drive it well.
- Invest in quality components: Reliable motors like the FingerTech Silver Spark and a solid radio system like FlySky FS-i6X make all the difference.
- Safety is non-negotiable: Always use weapon locks, proper battery handling, and personal protective gear.
- Community is your secret weapon: Join forums, attend events, and learn from veterans.
If you’re wondering about the best path forward, we confidently recommend starting with a 1-lb Antweight build using FingerTech parts, Fusion 360 CAD, and 3D printed Garolite or TPU armor. This combo balances cost, complexity, and competitive viability. From there, you can scale up or specialize.
Remember our rookie story about Toast-R-Crunch? It’s proof that perseverance, not perfection, wins matches. So grab your tools, fire up your CAD software, and let the robot wrestling adventure begin! 🤖💥
🔗 Recommended Links
Shop Essential Robot Wrestling Gear
-
FingerTech Robotics Parts:
Amazon FingerTech Robotics Search | FingerTech Official Website -
FlySky FS-i6X Radio System:
Amazon FlySky FS-i6X | FlySky Official Website -
Turnigy and CNHL LiPo Batteries:
Amazon Turnigy LiPo Search | Amazon CNHL LiPo Search -
Prusa Mini+ 3D Printer:
Amazon Prusa Mini Search | Prusa Official Website -
Loctite 242 Threadlocker:
Amazon Loctite 242 -
McMaster-Carr Hardware:
McMaster-Carr
Recommended Books for Robot Builders
-
Robot Builder’s Bonanza by Gordon McComb — A classic guide covering electronics, mechanics, and programming fundamentals.
Amazon Link -
BattleBots: The Official Guide by BattleBots Team — Insider tips and stories from the pros.
Amazon Link -
Make: Combat Robots by Mark W. Tilden — A hands-on approach to building fighting robots.
Amazon Link
❓ FAQ

Where can I find parts and kits for building robot wrestlers?
You can source parts from specialized suppliers like FingerTech Robotics, which offers motors, ESCs, and chassis kits tailored for combat robots. HobbyKing and Amazon also carry LiPo batteries and radio systems. For hardware like screws and fasteners, McMaster-Carr is a reliable choice. Additionally, community forums and local robotics clubs often organize group buys or share surplus parts.
How do I program a robot for wrestling matches?
Most beginner combat robots use radio control (RC) systems that don’t require programming—just bind the transmitter to the receiver, and you’re ready to drive. However, if you want to build an autonomous sumo robot or add advanced features like weapon control or sensor-based navigation, you’ll need to program microcontrollers such as Arduino or Raspberry Pi. This involves writing code in C++ or Python to process sensor inputs and control motors accordingly. Tutorials for programming combat robots can be found on sites like Arduino Project Hub and Robot Wrestling™ Robot Design.
What are the best designs for robot wrestlers?
The most common and effective designs are:
- Wedges/Pushers: Simple, durable, and great for controlling matches.
- Vertical Spinners: High damage output but require careful balance and safety measures.
- Horizontal Spinners: Devastating side attacks but tricky to maneuver.
- Flippers/Lifters: Can flip opponents but often less durable.
Choosing the best design depends on your skill level, budget, and competition rules. Beginners often start with wedges due to their simplicity.
Can beginners participate in the Robot Wrestling League?
Absolutely! The Robot Wrestling League and many local competitions welcome beginners. Many events have starter classes like Antweight or Fairyweight designed for newcomers. It’s a great way to learn, meet fellow builders, and improve your skills. Check out RobotCombatEvents for beginner-friendly tournaments.
Are there specific rules for robot wrestling competitions?
Yes, most competitions follow standardized rules such as those from SPARC or BattleBots. Rules cover weight limits, weapon types, safety requirements (like failsafes and weapon locks), and arena specifications. Always read the event’s rulebook carefully before building. You can find official SPARC rules at sparc.tools.
What materials do I need to build a robot wrestler?
You’ll need:
- Structural materials: Aluminum, Garolite (G10), UHMW plastic, carbon fiber, or 3D printing filaments like TPU or nylon.
- Mechanical parts: Motors, wheels, gears, belts, fasteners.
- Electronics: ESCs, batteries, radio transmitter/receiver, wiring, connectors.
- Tools: Soldering iron, hex keys, drill, Dremel, calipers.
How much does it cost to build a competitive robot wrestler?
Costs vary widely by class and ambition. A basic 1-lb Antweight can be built for around $150-$300, including radio gear and batteries. Larger classes like Beetleweight or Featherweight can cost $500-$2000+ depending on materials and machining. Budgeting for spare parts and repairs is essential.
What skills do I need to build a robot for the Robot Wrestling League?
- Mechanical skills: Basic machining, 3D printing, assembly.
- Electronics: Soldering, wiring, understanding motor controllers.
- Design: CAD modeling and weight budgeting.
- Driving: Practice controlling your robot effectively.
- Safety awareness: Handling LiPo batteries and powerful motors safely.
Can I use 3D printing to create parts for my robot wrestler?
Yes! 3D printing is ideal for small to medium robots, especially Antweights and Beetleweights. Materials like TPU and Nylon PA12 offer good durability and impact resistance. For heavier classes, metal fabrication or CNC machining is preferred for structural parts.
What are the most common types of robot wrestlers in competitions?
- Wedges: Push and control opponents.
- Spinners: Deliver kinetic energy attacks.
- Flippers: Flip opponents out of the arena.
- Lifters: Lift and immobilize.
Each type requires different design and driving strategies.
How do I program a robot wrestler for battle strategies?
Programming involves writing code to control motors and sensors for autonomous or semi-autonomous behavior. For example, sumo robots use IR sensors to detect ring edges and opponents. You’ll typically use microcontrollers like Arduino, programming in C++ or Python. For beginners, many combat robots rely solely on manual radio control.
📚 Reference Links
- BattleBots Official Site
- SPARC Rules and Resources
- FingerTech Robotics Official Website
- FlySky Official Website
- Turnigy LiPo Batteries on HobbyKing
- McMaster-Carr Hardware
- RobotCombatEvents – Find Local Competitions
- Arduino Project Hub
- Robot Wrestling™ Robot Design Category
- Facebook Post on Sumo Wrestler Model Project Ideas for 2D or 3D
Dive into these resources to deepen your knowledge and connect with the vibrant robot wrestling community!