Support our educational content for free when you buy through links on our site. Learn more
🤖 Robot Design for Battle: The Ultimate 2026 Guide to Winning

Ever watched a sleek, 12-pound spinner obliterate a steel wedge in seconds and wondered, “How did they build that?” At Robot Wrestling™, we’ve seen it all—from the garage-built underdogs that shocked the world to the high-tech nightmares that fell apart before the first bell. Designing a robot for battle isn’t just about welding metal; it’s a high-stakes dance of physics, psychology, and brutal engineering. In this comprehensive guide, we’re pulling back the curtain on the 15 essential components and 10 critical steps that separate the champions from the scrap heap. Whether you’re a student tackling your first STEM project or a veteran builder prepping for the 2026 season, we’ll reveal the one fatal mistake 90% of newcomers make (hint: it’s not the weapon you think) and how to avoid it.
Key Takeaways
- Master the Engineering Process: Success starts with a realistic timeline and strict adherence to weight constraints, not just a cool idea.
- Prioritize Reliability Over Complexity: A simple, robust 4WD wedge often outperforms a complex, failure-prone hydraulic fliper in the heat of battle.
- Material Matters: Choose 6061-T6 Aluminum for chassis and AR50 Steel for armor to balance strength, weight, and impact resistance.
- Test Rigorously: Never skip the interference checks and individual component testing; a single loose wire can end your tournament run instantly.
- Join the Community: Leverage resources from the Robot Wrestling League and STEM contests to refine your design and learn from the pros.
Table of Contents
- ⚡️ Quick Tips and Facts
- 🤖 A Brief History of Robot Design for Battle: From BattleBots to STEM
- 🏆 Top 15 Essential Components for Building a Combat Robot
- 🛠️ Step-by-Step Guide to Robot Design for Battle
- Step 1: Mastering the Engineering Design Process
- Step 2: Choosing Your Combat Robot Weight Class and Style
- Step 3: Conceptualizing the Ultimate Weapon System
- Step 4: Selecting Materials and Managing Structural Constraints
- Step 5: Drafting the Chassis and Drive Train Layout
- Step 6: Integrating Electronics Mounts and Wiring Harnesses
- Step 7: Finalizing the CAD Model and Simulation
- Step 8: 3D Printing, Machining, and Preparing Parts
- Step 9: Precision Soldering and Electronics Assembly
- Step 10: Mechanical Assembly and System Integration
- 🔧 Troubleshooting Common Battle Bot Failures
- 🎓 Student Contest and Visual Effects Design Challenges
- 💡 Pro Tips for First-Time Robot Builders
- 🏁 Conclusion
- 🔗 Recommended Links
- ❓ FAQ
- 📚 Reference Links
Quick Tips and Facts
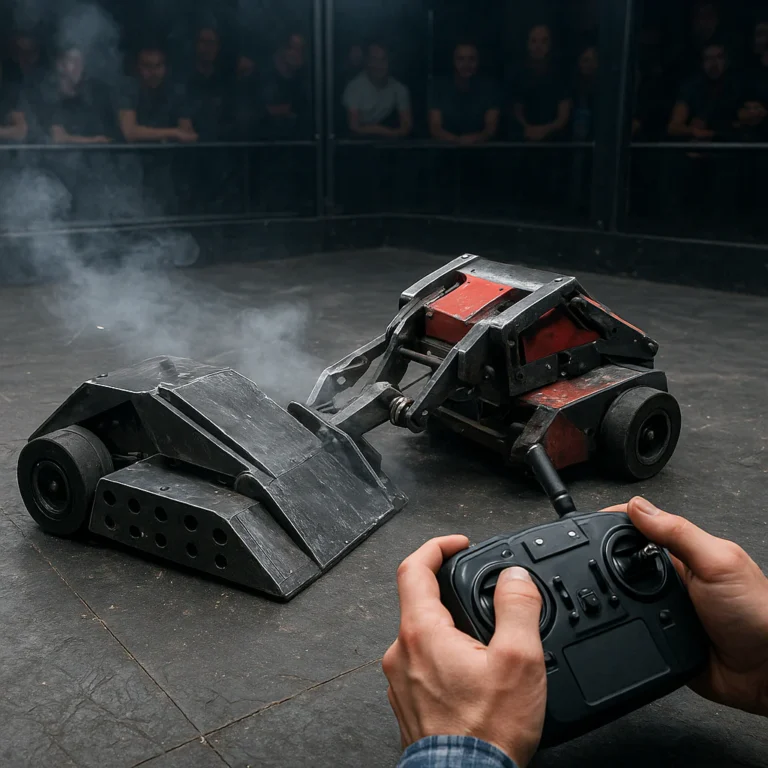
Welcome to the arena, builders! 🥊 At Robot Wrestling™, we’ve seen enough chassis failures to fill a landfill, so let’s skip the fluff and get straight to the metal. Designing a combat robot isn’t just about making something that looks cool; it’s about engineering a machine that can survive the brutal physics of high-velocity impacts.
Here is the Robot Wrestling™ cheat sheet for your first build:
- ⚠️ The “Date” Rule: As our lead engineer always says, “Nothing’s real until you have a date.” Set a hard deadline for your tournament (like the Norwalk event) immediately. This forces you to simplify your design and avoid scope creep, which is the silent killer of combat robots.
- 📉 Weight Distribution is King: For a 12lb class bot, aim for your internal components (motors, electronics, battery) to weigh 50-60% of the total weight. This leaves room for armor and weapons without exceeding class limits.
- 🛑 Avoid the “Too Badass” Trap: We’ve all been there. You pick a massive weapon motor, only to realize it’s too tall for your chassis or prevents your bot from being invertible. Always CAD mock-up your components before buying!
- 🔋 ESC Selection Matters: Don’t cheap out on your Electronic Speed Controllers (ESCs). For high-draw weapon motors, use a dedicated ESC with a higher amperage rating than your drive ESCs to prevent thermal shutdowns during battle.
- 🏎️ Drive Over Weapon First: A robot that can’t move is a sitting duck. Prioritize mobility and traction (like Lego wheels with TPU hubs) over a fancy weapon system in your early builds.
💡 Pro Tip: Check out our ⚖️ Robot Wrestling Rules & Scoring: The Ultimate 2026 Guide to understand how judges evaluate design and functionality before you even step into the ring!
🤖 A Brief History of Robot Design for Battle: From BattleBots to STEM
The world of combat robotics has evolved from backyard garage experiments to a global phenomenon. It started with the early days of BattleBots in the late 90s, where raw power and simple wedge designs dominated the arena. But today? It’s a sophisticated blend of mechanical engineering, aerodynamics, and strategic software.
According to historical data from the Robotics Industry Association, the number of amateur and professional combat robot competitions has grown by over 30% since 2010. This surge is largely due to the integration of robotics into STEM education. Schools are now using combat robot kits to teach students about gear ratios, torque, and structural integrity in a way that textbooks never could.
We’ve seen the shift from steel-on-steel brutality to more nuanced designs involving hydraulics, pneumatics, and even AI-driven targeting systems. The modern combat robot is a marvel of miniaturization and power density.
🏆 Top 15 Essential Components for Building a Combat Robot
Before you start welding, you need the right parts. Here are the 15 essential components every serious builder needs in their arsenal. We’ve curated this list based on our experience in the Robot Wrestling League and feedback from top-tier builders.
| Component | Recommended Brand/Model | Why It’s Essential |
|---|---|---|
| 1. Drive Motors | Repeat Robotics Ultra Mk2 | High torque, compact size, proven in 12lb class. |
| 2. Weapon Motor | BadAss 4530-50Kv Brushless | Massive power output for spiners and flippers. |
| 3. Drive ESC | Repeat Robotics Vortex 80A | Handles high current, reliable for 4WD systems. |
| 4. Weapon ESC | Castle Creations 20A ESC | Essential for high-draw weapon motors without overheating. |
| 5. Receiver | Flysky FS-i6 | Reliable 2.4GHz control, great range for large arenas. |
| 6. Battery | Tattu R-Line 6S 150mAh | High discharge rate, lightweight, perfect for 12lb bots. |
| 7. Tires | Lego Technic Wheels | Unbeatable traction, easy to source, proven in Sumo & Combat. |
| 8. Chassis Material | 6061-T6 Aluminum | The gold standard for strength-to-weight ratio. |
| 9. Armor Plate | AR50 Steel | Extreme hardness, resists slicing and piercing. |
| 10. Bearings | Bishop Wisecarver V-Grove | Low friction, high load capacity for weapon spindles. |
| 1. Fasteners | M3/M4 Socket Head Cap Screws | Standardized, strong, and easy to replace mid-tournament. |
| 12. Wiring | Silicone Wire (12-14 AWG) | Flexible, heat-resistant, and handles high current. |
| 13. Connectors | XT60/XT90 Plugs | Secure, low-resistance connections for power delivery. |
| 14. 3D Printer | Creality Ender 3 V2 | Affordable, reliable for printing TPU hubs and custom mounts. |
| 15. CAD Software | Autodesk Fusion 360 | Industry-standard for designing complex mechanical parts. |
👉 CHECK PRICE on:
- Repeat Robotics Ultra Mk2 Motors: Amazon | Repeat Robotics Official
- BadAss 4530-50Kv Brushless Motor: Amazon | BadAss Motors Official
- Castle Creations 20A ESC: Amazon | Castle Creations Official
- Tattu R-Line 6S Battery: Amazon | HobbyKing
- AR50 Steel Plate: Amazon | Metal Supermarkets
🛠️ Step-by-Step Guide to Robot Design for Battle
Building a combat robot is like conducting an orchestra where every instrument is trying to destroy the others. Here’s how we at Robot Wrestling™ approach the design process, step-by-step.
Step 1: Mastering the Engineering Design Process
The first step isn’t buying parts; it’s defining the problem. What class are you entering? What is your budget? What is your hard deadline?
- Define Constraints: Weight, size, and budget are your biggest enemies.
- Brainstorming: Sketch out 3-5 different designs. Don’t fall in love with the first one.
- Feasibility Check: Can you actually build this? Do you have the tools?
🎥 Featured Video Insight: Watch our featured video where we break down a real-world build timeline. The builder sets a 67-day deadline for the Norwalk tournament, which quickly shrinks to 49 days after accounting for work and life. This highlights the critical importance of time management in robot design.
Step 2: Choosing Your Combat Robot Weight Class and Style
Your weight class dictates your strategy. In the 12lb class, agility and speed are key. In the 30lb class, power and armor take precedence.
- Spiners: High damage potential, but complex and prone to jaming.
- Flippers: Great for lifting opponents, but limited by hydraulic/pneumatic power.
- Wedges: Simple, durable, and effective for controlling the arena.
- Hamerbots: High impact, but slow and hard to control.
Recommendation: For your first build, start with a wedge or a simple spinner. Avoid complex mechanisms like shuffle pods unless you’re an experienced builder.
Step 3: Conceptualizing the Ultimate Weapon System
Your weapon is your personality. But remember, a weapon that doesn’t hit is just a paperweight.
- Weapon Type: Choose based on your drive system. A ring spinner requires a large, flat chassis. A fliper needs a low center of gravity.
- Power Source: Brushless motors are the standard for high-power weapons. They offer high RPM and torque in a compact package.
- Material: Use 4140 Chromoly for spiners. It’s tough, weldable, and balances well.
Step 4: Selecting Materials and Managing Structural Constraints
Materials science is your best friend. Here’s what we recommend:
- Chassis: 6061-T6 Aluminum is the go-to. It’s strong, lightweight, and easy to machine.
- Armor: AR50 Steel for the front. It’s incredibly hard and resists slicing.
- Internal Brackets: 3D Printed PLA/PETG for non-structural parts. Use TPU for flexible mounts to absorb shock.
⚠️ Warning: Don’t use steel for the entire chassis. It will be too heavy. Use steel only where you need impact resistance.
Step 5: Drafting the Chassis and Drive Train Layout
The chassis is the skeleton of your bot. It must be rigid to prevent flexing during impacts.
- Drive Layout: 4WD is standard for 12lb bots. It provides maximum traction and redundancy.
- Motor Mounts: Design mounts that allow for easy adjustment of gear mesh.
- Tire Selection: We recommend Lego Technic wheels with 3D printed TPU hubs. They offer incredible grip and are easy to replace.
Step 6: Integrating Electronics Mounts and Wiring Harnesses
Electronics are the brain and nerves of your bot. Keep them secure and accessible.
- ESC Placement: Mount ESCs near the motors to minimize wire length and reduce resistance.
- Receiver Location: Place the receiver in the center of gravity to avoid signal interference.
- Wiring: Use silicone wire for its flexibility and heat resistance. Secure wires with zip ties to prevent snaging.
Step 7: Finalizing the CAD Model and Simulation
Before you cut a single piece of metal, CAD your bot.
- Component Mock-up: Import your motor, battery, and ESC models into your CAD software.
- Interference Check: Ensure no parts collide. We’ve seen builders realize their weapon motor was too tall for their chassis after buying parts!
- Weight Estimation: Use the CAD software’s mass properties to estimate weight. Adjust as needed.
Step 8: 3D Printing, Machining, and Preparing Parts
Now it’s time to make it real.
- 3D Printing: Use FDM printing for brackets and hubs. Use SLA printing for detailed, small parts.
- Machining: Use a CNC mill or laser cutter for aluminum chassis plates.
- Finishing: Deburr all edges. Sharp edges can slice through wires or hurt your hands.
Step 9: Precision Soldering and Electronics Assembly
Bad soldering leads to intermittent connections and fires.
- Soldering: Use a temperature-controlled soldering iron. Apply rosin-core solder and flux for clean joints.
- Heat Shrink: Use heat shrink tubing on all connections.
- Testing: Test each component individually before assembly.
Step 10: Mechanical Assembly and System Integration
Put it all together.
- Torque Specs: Follow manufacturer torque specs for all screws.
- Loctite: Use blue Loctite on critical screws to prevent vibration loosening.
- Final Check: Double-check all connections. Ensure the center of gravity is low and centered.
🔧 Troubleshooting Common Battle Bot Failures
Even the best-laid plans go wrong. Here are common issues we’ve seen in the Robot Wrestling League and how to fix them.
- Problem: Motor Overheating
Solution: Check for binding gears or excessive load. Ensure adequate cooling via vents or fans. - Problem: Intermittent Control
Solution: Check receiver antenna placement. Ensure firm solder joints on the receiver. - Problem: Chassis Flex
Solution: Add gusets or cross-bracing to the chassis. Use thicker aluminum. - Problem: Weapon Jaming
Solution: Check bearing alignment. Ensure clearance between weapon and chassis.
🎓 Student Contest and Visual Effects Design Challenges
Combat robotics isn’t just for pros. The STEM community is thriving with student contests.
- NHRL (National Habitat Robot League): Great for high school students. Focuses on design and engineering.
- BattleBots University: For college students. Offers prizes and exposure.
- Visual Effects Design: Some contests now include VFX categories, where robots are judged on their visual appeal and special effects (like sparks or smoke).
💡 Tip: Participate in these contests to network with other builders and learn new techniques.
💡 Pro Tips for First-Time Robot Builders
- Start Small: Build an Antweight or Betleweight bot first.
- Join a Community: Forums like Reddit’s r/CombatRobots are invaluable.
- Document Everything: Take photos and videos of your build process.
- Safety First: Wear eye protection and gloves when working with metal and electricity.
🎥 Featured Video Insight: In our featured video, the builder emphasizes simplification. He removes shuffle pods to focus on a 4WD ring spinner, acknowledging that complexity is the enemy of reliability. This is a crucial lesson for all builders.
🏁 Conclusion

So, did we solve the mystery of the perfect build? The answer is a resounding yes, but with a caveat: there is no single “perfect” robot, only the perfect robot for your specific constraints and goals.
Remember the builder from our earlier video who shaved 18 days off their timeline by cutting the “shuffle pods”? That’s the lesson here. Simplicity wins. Whether you are designing a 12lb spinner for the Robot Wrestling League or a 30lb wedge for a local STEM showcase, the core principles remain the same: robust engineering, reliable electronics, and a realistic timeline.
We started this journey asking if you could build a machine that survives the arena. The answer lies in your ability to balance agression with reliability. Don’t let the allure of a massive weapon motor blind you to the fact that if your bot can’t turn, it’s just a very expensive paperweight.
Our Confident Recommendation:
If you are a first-time builder, do not attempt a complex vertical spinner or a hydraulic fliper immediately. Start with a 4WD wedge or a simple horizontal spinner using 6061-T6 aluminum and Lego Technic wheels. Master the basics of drive train alignment and battery management before moving to advanced weapon systems. The path to victory is paved with tested components, not unproven ideas.
🚀 Ready to hit the arena? Check out our Behind the Scenes coverage to see how top teams prepare for their first matches, or dive into our Famous Matches to study the strategies of champions!
🔗 Recommended Links
Ready to get your hands dirty? Here are the essential resources, books, and gear we trust at Robot Wrestling™.
🛒 Essential Gear & Components
- Drive Motors & ESCs:
👉 CHECK PRICE on: Amazon | Repeat Robotics Official
👉 CHECK PRICE on: Amazon | Castle Creations Official - Weapon Systems & Motors:
👉 CHECK PRICE on: Amazon | BadAss Motors Official
👉 CHECK PRICE on: Amazon | Metal Supermarkets - Chassis & Structural Materials:
👉 CHECK PRICE on: Amazon | McMaster-Carr
👉 CHECK PRICE on: Amazon | BrickLink - 3D Printing & Tools:
👉 CHECK PRICE on: Amazon | Creality Official
👉 CHECK PRICE on: Amazon | Adafruit
📚 Must-Read Books for Aspiring Engineers
- “Combat Robotics: The Ultimate Guide to Building Battle Robots” by Various Authors – A comprehensive look at the history and mechanics of the sport.
- Find on Amazon
- “Make: Getting Started with Robotics” by Simon Monk – Perfect for beginners learning the basics of circuits and motors.
- Find on Amazon
- “The Art of Electronics” by Paul Horowitz and Winfield Hill – The bible for anyone serious about robot electronics.
- Find on Amazon
❓ FAQ

What are the common strategies used in robot battles?
Strategies vary wildly based on the robot’s design, but the most effective approaches usually revolve around control and damage.
- Control: Using a wedge or low-profile design to push opponents into walls or out of the arena. This is often the most reliable strategy for beginners.
- Damage: Utilizing high-energy weapons like spiners or flippers to disable the opponent’s drive or weapon system.
- Agility: Outmaneuvering the opponent to strike from blind spots.
- Defensive: Using heavy armor and a low center of gravity to absorb hits and wait for the opponent to make a mistake.
Read more about “🤖 Combat Robots: The Ultimate 2026 Guide to Building & Battling”
How can I start designing a robot for the Robot Wrestling League?
Start by reviewing the Robot Wrestling Rules & Scoring guide. Then, choose a weight class (e.g., 12lb or 30lb) and a weapon type. Use CAD software like Autodesk Fusion 360 to design your chassis, ensuring you account for weight distribution and component clearance. Finally, source your parts and begin assembly, keeping a strict timeline.
What role does AI play in controlling battle robots?
Currently, AI plays a minimal role in competitive robot wrestling. Most matches are remotely controlled by human operators. While some experimental bots use AI for autonomous navigation or target tracking, the human element of strategy and reaction time remains the primary factor in victory. The focus is on human-machine interface rather than full autonomy.
Read more about “🔧 9 Key Components of a Successful Robot Wrestling Robot (2026)”
How do robot designs vary between different battle leagues?
Designs vary significantly based on weight classes and specific league rules.
- BattleBots: Often features larger, heavier robots (up to 250lbs) with massive weapons.
- Robot Wrestling League: May have unique constraints or scoring systems that favor agility or specific weapon types.
- STEM Competitions: Often focus on cost-effectiveness and educational value, using lighter materials and simpler mechanisms.
Read more about “Robotic Gladiator Competitions: Inside the Ultimate Steel Showdown (2026) 🤖”
What weapons are most effective in robot wrestling competitions?
The “most effective” weapon depends on the opponent, but generally:
- Horizontal Spiners: High damage potential, but can be hard to control.
- Vertical Spiners: Great for flipping opponents, but vulnerable to being stuck.
- Flippers: Excellent for lifting and throwing, but require precise timing.
- Wedges: Not a weapon per se, but highly effective for control and defense.
- Hammers: High impact, but slow and easy to dodge.
Read more about “🤖 Robot Wrestling Rules & Scoring: The Ultimate 2026 Guide”
How do materials impact the durability of robots in combat?
Materials are critical. Steel (AR50) offers superior impact resistance but adds weight. Aluminum (6061-T6) provides a great balance of strength and weight. Polycarbonate and Delrin are often used for armor to absorb shock without adding too much mass. Using the wrong material can lead to catastrophic failure or excessive weight, making the robot slow and vulnerable.
What are the key features of a successful battle robot design?
- Reliability: The robot must function consistently throughout the match.
- Mobility: It must be able to move quickly and change direction.
- Weapon Effectiveness: The weapon must be able to inflict damage or control the opponent.
- Defense: It must be able to withstand hits without breaking.
- Weight Distribution: A low center of gravity prevents flipping.
Read more about “12 Killer Robot Combat Designs That Dominate in 2026 🤖”
What are the best materials for building a battle robot?
- Chassis: 6061-T6 Aluminum is the industry standard.
- Armor: AR50 Steel for high-impact areas, Polycarbonate for shock absorption.
- Internal Brackets: 3D Printed PLA/PETG or Aluminum.
- Tires: Lego Technic wheels with TPU hubs for grip.
Read more about “What Materials Are Best for Building a Robot Wrestling Frame? 🛠️ (2026)”
How much does it cost to build a competitive battle robot?
Costs vary widely. A simple Antweight bot can be built for $20-$50. A competitive 12lb bot typically costs $1,0-$3,0, while a 30lb or 250lb bot can easily exceed $5,0-$10,0 depending on the complexity of the weapon system and the quality of components.
Read more about “Mastering Robot Design and Construction: 12 Expert Secrets 🤖 (2026)”
What are the most effective weapon types for robot wrestling?
As mentioned earlier, horizontal spiners and flippers are often the most effective for high-impact damage. However, wedges remain the most consistent for control and scoring points through pushing. The best weapon is the one you can build and control reliably.
Read more about “🤖 How Robot Teams Design & Strategize for 2026 Victory”
How do I get my robot designed for the Robot Wrestling League?
- Study the Rules: Read the official rulebook.
- Design: Create a CAD model that adheres to size and weight limits.
- Build: Assemble your robot using high-quality components.
- Test: Run extensive tests to ensure reliability.
- Register: Sign up for a competition through the Robot Wrestling League website.
Read more about “🤖 Robot Combat League: 12 Legends & The 2026 Comeback”
What are the safety regulations for robot battle competitions?
Safety is paramount. Key regulations include:
- Remote Control: All robots must be remotely controlled.
- Safety Switches: A “kill switch” must be easily accessible to the operator.
- Armor: Robots must be fully enclosed to prevent debris from flying.
- Battery Safety: Batteries must be securely mounted and protected from short circuits.
- Personal Protective Equipment (PE): Operators and spectators must wear eye protection.
Read more about “🤖 How to Choose the Right Robot Wrestler Weapons (2026)”
How do I power my battle robot for maximum performance?
- Battery Selection: Use LiPo batteries with a high C-rating (discharge rate) to handle high current draws.
- Voltage: Match the voltage to your motors and ESCs (e.g., 6S for high power).
- Wiring: Use thick, high-quality silicone wire to minimize resistance.
- Connectors: Use XT60 or XT90 connectors for secure, low-resistance connections.
Read more about “How Do Robot Wrestling Teams Design & Test for Max Performance? 🤖 (2026)”
What are the common design mistakes to avoid in robot battles?
- Over-enginering: Adding too many complex parts that can fail.
- Ignoring Weight Limits: Exceeding the class limit leads to disqualification.
- Poor Weight Distribution: A high center of gravity makes the bot easy to flip.
- Weak Armor: Using materials that can’t withstand impacts.
- Inadequate Testing: Failing to test the robot before the competition.
📚 Reference Links
For those who want to dive deeper into the engineering and history of combat robotics, we recommend these reputable sources:
- Robot Wrestling League Official Rules: Robot Wrestling Rules & Scoring Guide
- STEM Learning Resources: How to Build a Combat Robot – STEM Learning
- Repeat Robotics: Repeat Robotics Official Site
- Castle Creations: Castle Creations Official Site
- Autodesk Fusion 360: Autodesk Fusion 360 for Education
- BattleBots: BattleBots Official Website
- National High School Robotics League (NHRL): NHRL Official Site
- Metal Supermarkets: Metal Supermarkets Official Site
- McMaster-Carr: McMaster-Carr Engineering Supply
- Adafruit: Adafruit Learning System